Integrate MultiQC in your pipeline
Quality control in neuroimaging is an essential step to ensure good and
reproducible results, but it is often painful and requires a lot of manual
manipulation of final results. Pipelines developed within the nf-core
or nf-neuro ecosystem have access to a powerful tool to aggregate processing
results within interactive html reports: MultiQC.
This integration allows for an easy evaluation of key processing steps for every
subjects and/or a more global evaluation (population-level) using quantitative
metrics. In this tutorial, you will see an overview of how MultiQC can integrate
your data into a clean report, and how to implement it in your own pipeline.
Prerequisites
You need to work on a pipeline that follows the nf-core conventions and have access to the nf-core tools commands.
For the purpose of this walkthrough, we will reused the completed pipeline from the tutorial Your pipeline from A to Z.
Install MultiQC module
nf-core have already developed a dedicated module that runs MultiQC
and create the html report containing your data. However, we first need to install it
within your pipeline, to do so, run the following command:
nf-core modules --git-remote https://github.com/nf-core/modules.git -b master install multiqc ,--./,-. ___ __ __ __ ___ /,-._.--~\ |\ | |__ __ / ` / \ |__) |__ } { | \| | \__, \__/ | \ |___ \`-._,-`-, `._,._,'
nf-core/tools version 3.2.0 - https://nf-co.re
INFO Installing 'multiqc'INFO Use the following statement to include this module:
include { MULTIQC } from '../modules/nf-core/multiqc/main'Import MultiQC in your pipeline
Once your module is installed, you need to import it within
the main.nf file of your pipeline.
include { MULTIQC } from "./modules/nf-core/multiqc/main"1. Modify the MultiQC inputs
MultiQC was originally designed to perform quality control on genomic data on a population level. In the neuroimaging field, quality control is mostly done on a per-subject basis (with sometimes a general report summarizing quantitative data across the studied population). In this walkthrough, we will go over the two methods to create:
Creating the global report is natively supported by MultiQC.
However, we will need to tweak the existing inputs to create the
subject-specific reports. Check the modifications needed for the main.nf in ./modules/nf-core/multiqc/:
input: path multiqc_files, stageAs: "?/*" // Contains the files to extract data from. path(multiqc_config) // Configuration file for MultiQC. path(extra_multiqc_config) // Additional configuration file for MultiQC. path(multiqc_logo) // Custom logo to include in report. path(replace_names) // Option to replace some samples, not relevant to our case. path(sample_names) // Option to change sample name.input: tuple val(meta), path(qc_images) // Added input with subject meta field. path multiqc_files path(multiqc_config) path(extra_multiqc_config) path(multiqc_logo) path(replace_names) path(sample_names)2. Prefix your report with a subject specific tag
Now that we have a meta field that identifies our subjects, let’s use it
to name our resulting report. To do that, we need to modify how the
prefix variable is defined at the beginning of the script section.
Copy this new line and replace the existing def prefix... in your
MultiQC module (main.nf).
def prefix = task.ext.prefix ? "--filename ${task.ext.prefix}.html" : ''def prefix = "--filename ${meta.id}_multiqc_report"3. Change MultiQC container
We also want to change the container to use the official docker container for MultiQc.
container "${ workflow.containerEngine == 'singularity' && !task.ext.singularity_pull_docker_container ? 'https://depot.galaxyproject.org/singularity/multiqc:1.27--pyhdfd78af_0' : 'biocontainers/multiqc:1.27--pyhdfd78af_0' }" container "${ 'multiqc/multiqc:v1.27.1' }"4. Add a label to the process execution
Finally, we want to tag each execution of the module using this meta.id tag.
To do so, let’s add a tag "$meta.id" at the top of the process definition (main.nf).
process MULTIQC {    label 'process_single'
    <...>}
process MULTIQC { tag "$meta.id" label 'process_single'
<...>}Your MultiQC module is now up-and-running for our neuroimaging needs!
Create a subject MultiQC report
Preferably, QC files (either images or tabular-like files) should be
generated within your module and enabled using a flag that can be passed
using the task.ext arguments. In the tutorial pipeline, we are performing
simple operations to obtain FA values within gray matter (GM), white matter (WM),
and cerebrospinal fluid (CSF) masks. To ensure we obtain good results, we
should look at the FA map and validate they do not contain any artifact.
Luckily, the RECONST_DTIMETRICS module already includes a QC section, producing
screenshots of the generated metrics map. We will leverage this to create our
first section of our individual-level MultiQC report.
1. Collect QC files
-
To collect the QC files during pipeline execution we need to create an empty channel at the beginning of the workflow file. This empty channel will be populated when the modules output QC files. Add this line at the beginning of the workflow section in your
./main.nffile.ch_multiqc_files = Channel.empty() -
Since
RECONST_DTIMETRICSis nested within thePREPROC_DIFFsubworkflow, we also need to collect the files within the subworkflow to make them accessible in the main workflow. Identical to the step above, define an empty channel at the top of yourPREPROC_DIFF./subworkflows/local/preproc_diff/main.nf, right below themain:section.ch_multiqc_files = Channel.empty() -
Once all of our empty channels are defined, we can start populating them! If you look at the outputs of
RECONST_DTIMETRICS(either in the API documentation or directly in themain.nf), you will see an emitted channel calledmqc. This channel contains the QC files generated within the module. Let’s append this channel to our previously empty channel.// DTI-derived metricsRECONST_DTIMETRICS( input_dti )// DTI-derived metricsRECONST_DTIMETRICS( input_dti )ch_multiqc_files = ch_multiqc_files.mix(RECONST_DTIMETRICS.out.mqc) -
We now need to output this
ch_multiqc_filesfrom the subworkflow to make it accessible on the workflow level. We will add a new output in theemit:section of thePREPROC_DIFFsubworkflow.emit:dwi = ch_dwi_bvalbvec.dwi // channel: [ val(meta), dwi-raw ]dwi_denoised = DENOISING_MPPCA.out.image // channel: [ val(meta), dwi-after-mppca ]bvs_files = ch_dwi_bvalbvec.bvs_files // channel: [ val(meta), bval, bvec ]fa = RECONST_DTIMETRICS.out.fa // channel: [ val(meta), fa ]md = RECONST_DTIMETRICS.out.md // channel: [ val(meta), md ]emit:dwi = ch_dwi_bvalbvec.dwi // channel: [ val(meta), dwi-raw ]dwi_denoised = DENOISING_MPPCA.out.image // channel: [ val(meta), dwi-after-mppca ]bvs_files = ch_dwi_bvalbvec.bvs_files // channel: [ val(meta), bval, bvec ]fa = RECONST_DTIMETRICS.out.fa // channel: [ val(meta), fa ]md = RECONST_DTIMETRICS.out.md // channel: [ val(meta), md ]mqc = ch_multiqc_files // channel: [ val(meta), mqc ] -
We have now setup the structure to collect QC files and deliver them to the main workflow file. However, generating the QC files within
RECONST_DTIMETRICSis optional (as it is for all modules that have QC withinnf-neuro). To actually produce the QC files during runtime, we need to change theext.qcargument totrue. In thenextflow.configfile, locate theext.qcargument, and replacefalsewithtrue. We will also enable some of the other metrics to create a more meaningful QC report.withName: "RECONST_DTIMETRICS" {ext.ad = falseext.evecs = falseext.evals = falseext.fa = trueext.ga = falseext.rgb = falseext.md = trueext.mode = falseext.norm = falseext.rd = falseext.tensor = falseext.nonphysical = falseext.pulsation = falseext.residual = falseext.b0_thr_extract_b0 = 10ext.dwi_shell_tolerance = 50ext.max_dti_shell_value = 1200ext.run_qc = false}withName: "RECONST_DTIMETRICS" {ext.ad = trueext.evecs = falseext.evals = falseext.fa = trueext.ga = falseext.rgb = falseext.md = trueext.mode = falseext.norm = falseext.rd = trueext.tensor = falseext.nonphysical = falseext.pulsation = falseext.residual = falseext.b0_thr_extract_b0 = 10ext.dwi_shell_tolerance = 50ext.max_dti_shell_value = 1200ext.run_qc = true} -
Final step before being ready to supply those files to the MultiQC module is to append the QC files from the
PREPROC_DIFFsubworkflow to thech_multiqc_filesin the main workflow (./main.nf). We will use the same approach as step 3 above.//Processing DWIPREPROC_DIFF( inputs.dwi )//Processing DWIPREPROC_DIFF( inputs.dwi )ch_multiqc_files = ch_multiqc_files.mix(PREPROC_DIFF.out.mqc)
2. Supply QC files to MultiQC
Now that the QC files are accessible in the main workflow, we can supply those files to the MultiQC module. However, we need to format the channel to make it in a way the module expects it to be. The following steps will go through this formatting and include the module in the main workflow.
-
In the previous section, we appended our QC files to a single channel using the
.mixNextflow operator. This operator works similarly to how we append items to a list in python and returns a single list of files. When we have multiple subjects, this means the files from a single subject are not necessarily grouped together. Since we do not want to mix up our subjects in our MultiQC report, we will use the.groupTupleoperator. Since all of our files are tagged with metadata (under themetavalue), this will group every files with identical metadata, ensuring we do not have mixed up reports. Finally, as we saw in the MultiQC inputs section, the module expect atuple val(meta), path(files). To make sure we respect this input definition, we will flatten the files into a single list. Add the following lines at the end of our main workflow definition:ch_multiqc_files = ch_multiqc_files.groupTuple().map { meta, files_list ->def files = files_list.flatten().findAll { it != null }return tuple(meta, files)} -
Once the channel is properly reformatted, we can safely set it as input to our MultiQC module. Since we already imported the module at the top of the
./main.nffile, we can simply call it, and fill the MultiQC inputs with empty list if we do not have them.MULTIQC(ch_multiqc_files,[],[],[],[],[],[]) -
Now, you can run nextflow..
Terminal window nextflow run main.nf --input data -profile docker -resumeTerminal window N E X T F L O W ~ version 24.10.4Launching `main.nf` [irreverent_shaw] DSL2 - revision: aa9a350f39[31/3d8beb] PREPROC_DIFF:DENOISING_MPPCA (sub-003_ses-01) [100%] 1 of 1, cached: 1 ✔[b6/47c33f] PREPROC_DIFF:RECONST_DTIMETRICS (sub-003_ses-01) [100%] 1 of 1, cached: 1 ✔[fe/618dca] PREPROC_T1:DENOISING_NLMEANS (sub-003_ses-01) [100%] 1 of 1, cached: 1 ✔[53/503632] PREPROC_T1:BETCROP_SYNTHBET (sub-003_ses-01) [100%] 1 of 1, cached: 1 ✔[bb/f19643] STATS_METRICSINROI (sub-003_ses-01) [100%] 1 of 1, cached: 1 ✔[43/e595d3] MULTIQC (sub-003_ses-01) [100%] 1 of 1, cached: 1 ✔Your resulting MultiQC report should look similar to this:
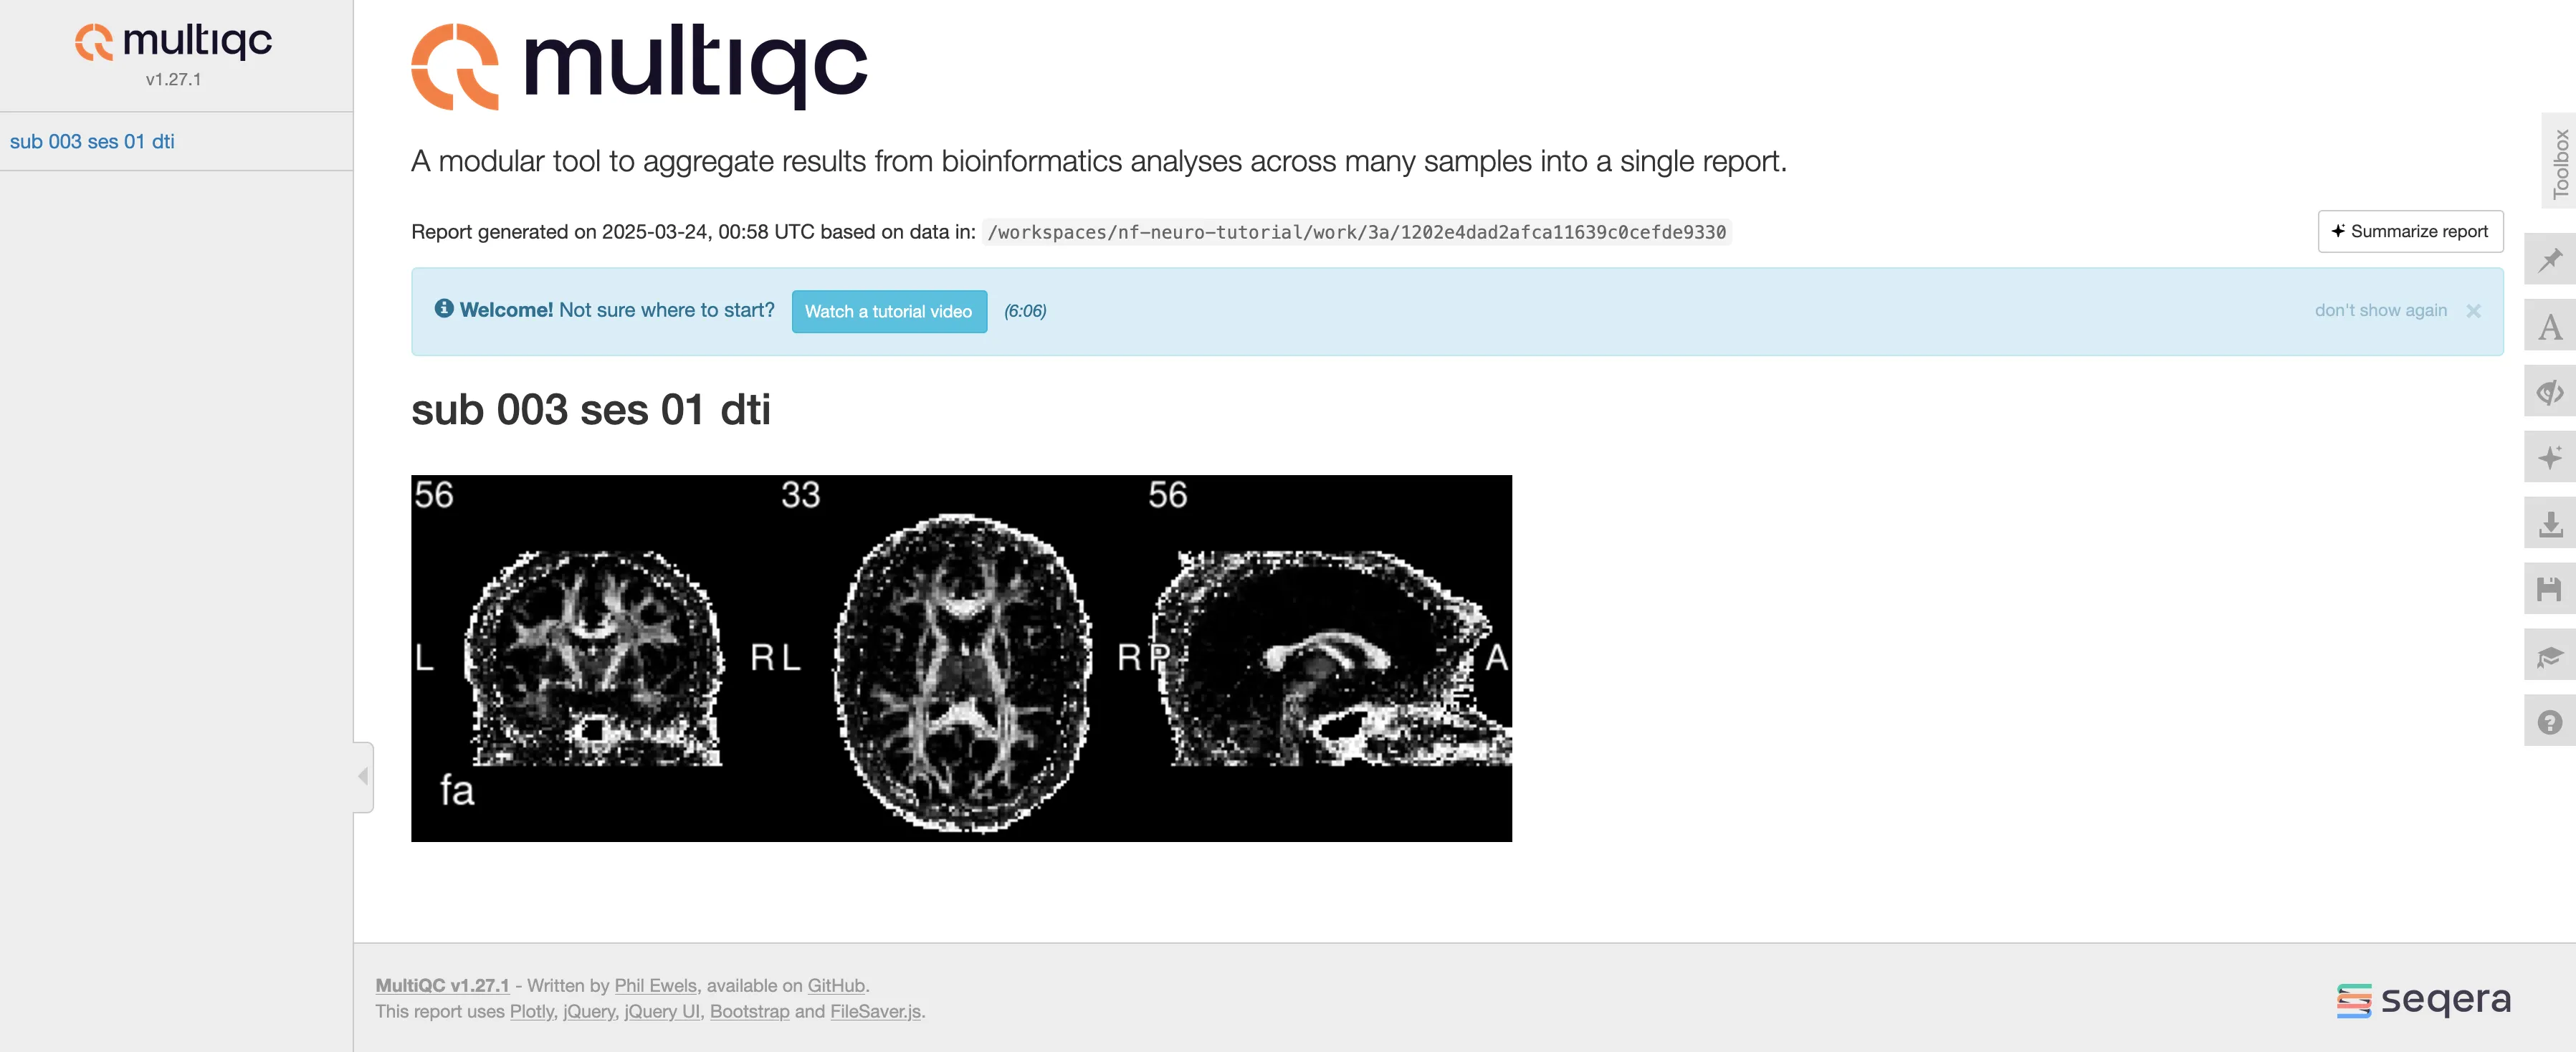
As you can see, there isn’t much in the report for now other than our generated screenshot. Hopefully, we can customize this section to add proper heading, description, etc.
3. Customize your MultiQC report
We have now learned how to collect QC files, supply them to MultiQC, and generate a per-subject report. However, our report is not really informative as it does not contain any heading or description for our QC image. This can be solved using a custom MultiQC config file. This section will provide detailed instructions to create your own config file.
-
Create a
./assets/multiqc_config.ymlfile.Terminal window mkdir assetstouch assets/multiqc_config.yml -
Let’s start by adding a general comment to describe the origin of the MultiQC report. This is done by adding a
report_commentsection at the top of the config file.report_comment: >This report has been generated by the nf-neuro tutorial! -
Then, we can define the order of our future section, starting with a
dti_qcsection that will contain our FA QC image.report_section_order:dti_qc:order: -1001 -
It is now time to add our
custom_datasection. This is where we will define the title of our section containing our FA QC image and its description.custom_data:dti_qc:file_format: "png"section_name: "DTI QC"description: |This section contains QC images for diffusion tensor imaging (DTI) metricmaps. Add specifications regarding how to evaluate those images, for example:To assess the quality of the DTI metrics, ensure that FA highlights major whitematter tracts with expected high values (e.g., corpus callosum, corticospinal tract, etc.)...plot_type: "image" -
In order for MultiQC to fetch the right files for each section, you need to specify which pattern to use to match your files for this specific section. This can be done using the
spitem.sp:dti_qc:fn: "*dti_mqc.png"You should now have your complete
multiqc_config.ymlfile! It should look similar to this:report_comment: >This report has been generated by the nf-neuro tutorial!report_section_order:dti_qc:order: -1001custom_data:dti_qc:file_format: "png"section_name: "DTI QC"description: |This section contains QC images for diffusion tensor imaging (DTI) metricmaps. Add specifications regarding how to evaluate those images, for example:To assess the quality of the DTI metrics, ensure that FA highlights major whitematter tracts with expected high values (e.g., corpus callosum, corticospinal tract, etc.)...plot_type: "image"sp:dti_qc:fn: "*dti_mqc.png" -
The final step consists of supplying this QC file to your MultiQC module. To fetch external files, you can use the
Channel.fromPath()channel factory combined with the$projectDirvariable available in the standard Nextflow library. Let’s fetch the config file and supply it to the MultiQc module. Change your./main.nffile.// MultiQCMULTIQC(ch_multiqc_files,[],[],[],[],[],[])ch_multiqc_config = Channel.fromPath("$projectDir/assets/multiqc_config.yml", checkIfExists: true)// MultiQCMULTIQC(ch_multiqc_files,[],ch_multiqc_config.toList(),[],[],[],[]) -
Now, you can run nextflow..
Terminal window nextflow run main.nf --input data -profile docker -resumeTerminal window N E X T F L O W ~ version 24.10.4Launching `main.nf` [compassionate_kimura] DSL2 - revision: dbd86e4af5executor > local (1)[63/c712f5] PRE…_DIFF:DENOISING_MPPCA (sub-003_ses-01) | 1 of 1, cached: 1 ✔[b1/101edf] PRE…FF:RECONST_DTIMETRICS (sub-003_ses-01) | 1 of 1, cached: 1 ✔[fe/618dca] PRE…_T1:DENOISING_NLMEANS (sub-003_ses-01) | 1 of 1, cached: 1 ✔[53/503632] PRE…C_T1:BETCROP_SYNTHBET (sub-003_ses-01) | 1 of 1, cached: 1 ✔[d7/c9806a] STATS_METRICSINROI (sub-003_ses-01) | 1 of 1, cached: 1 ✔[c5/0eaffa] MULTIQC (sub-003_ses-01) | 1 of 1 ✔Your newly generated MultiQC report should now look like this:
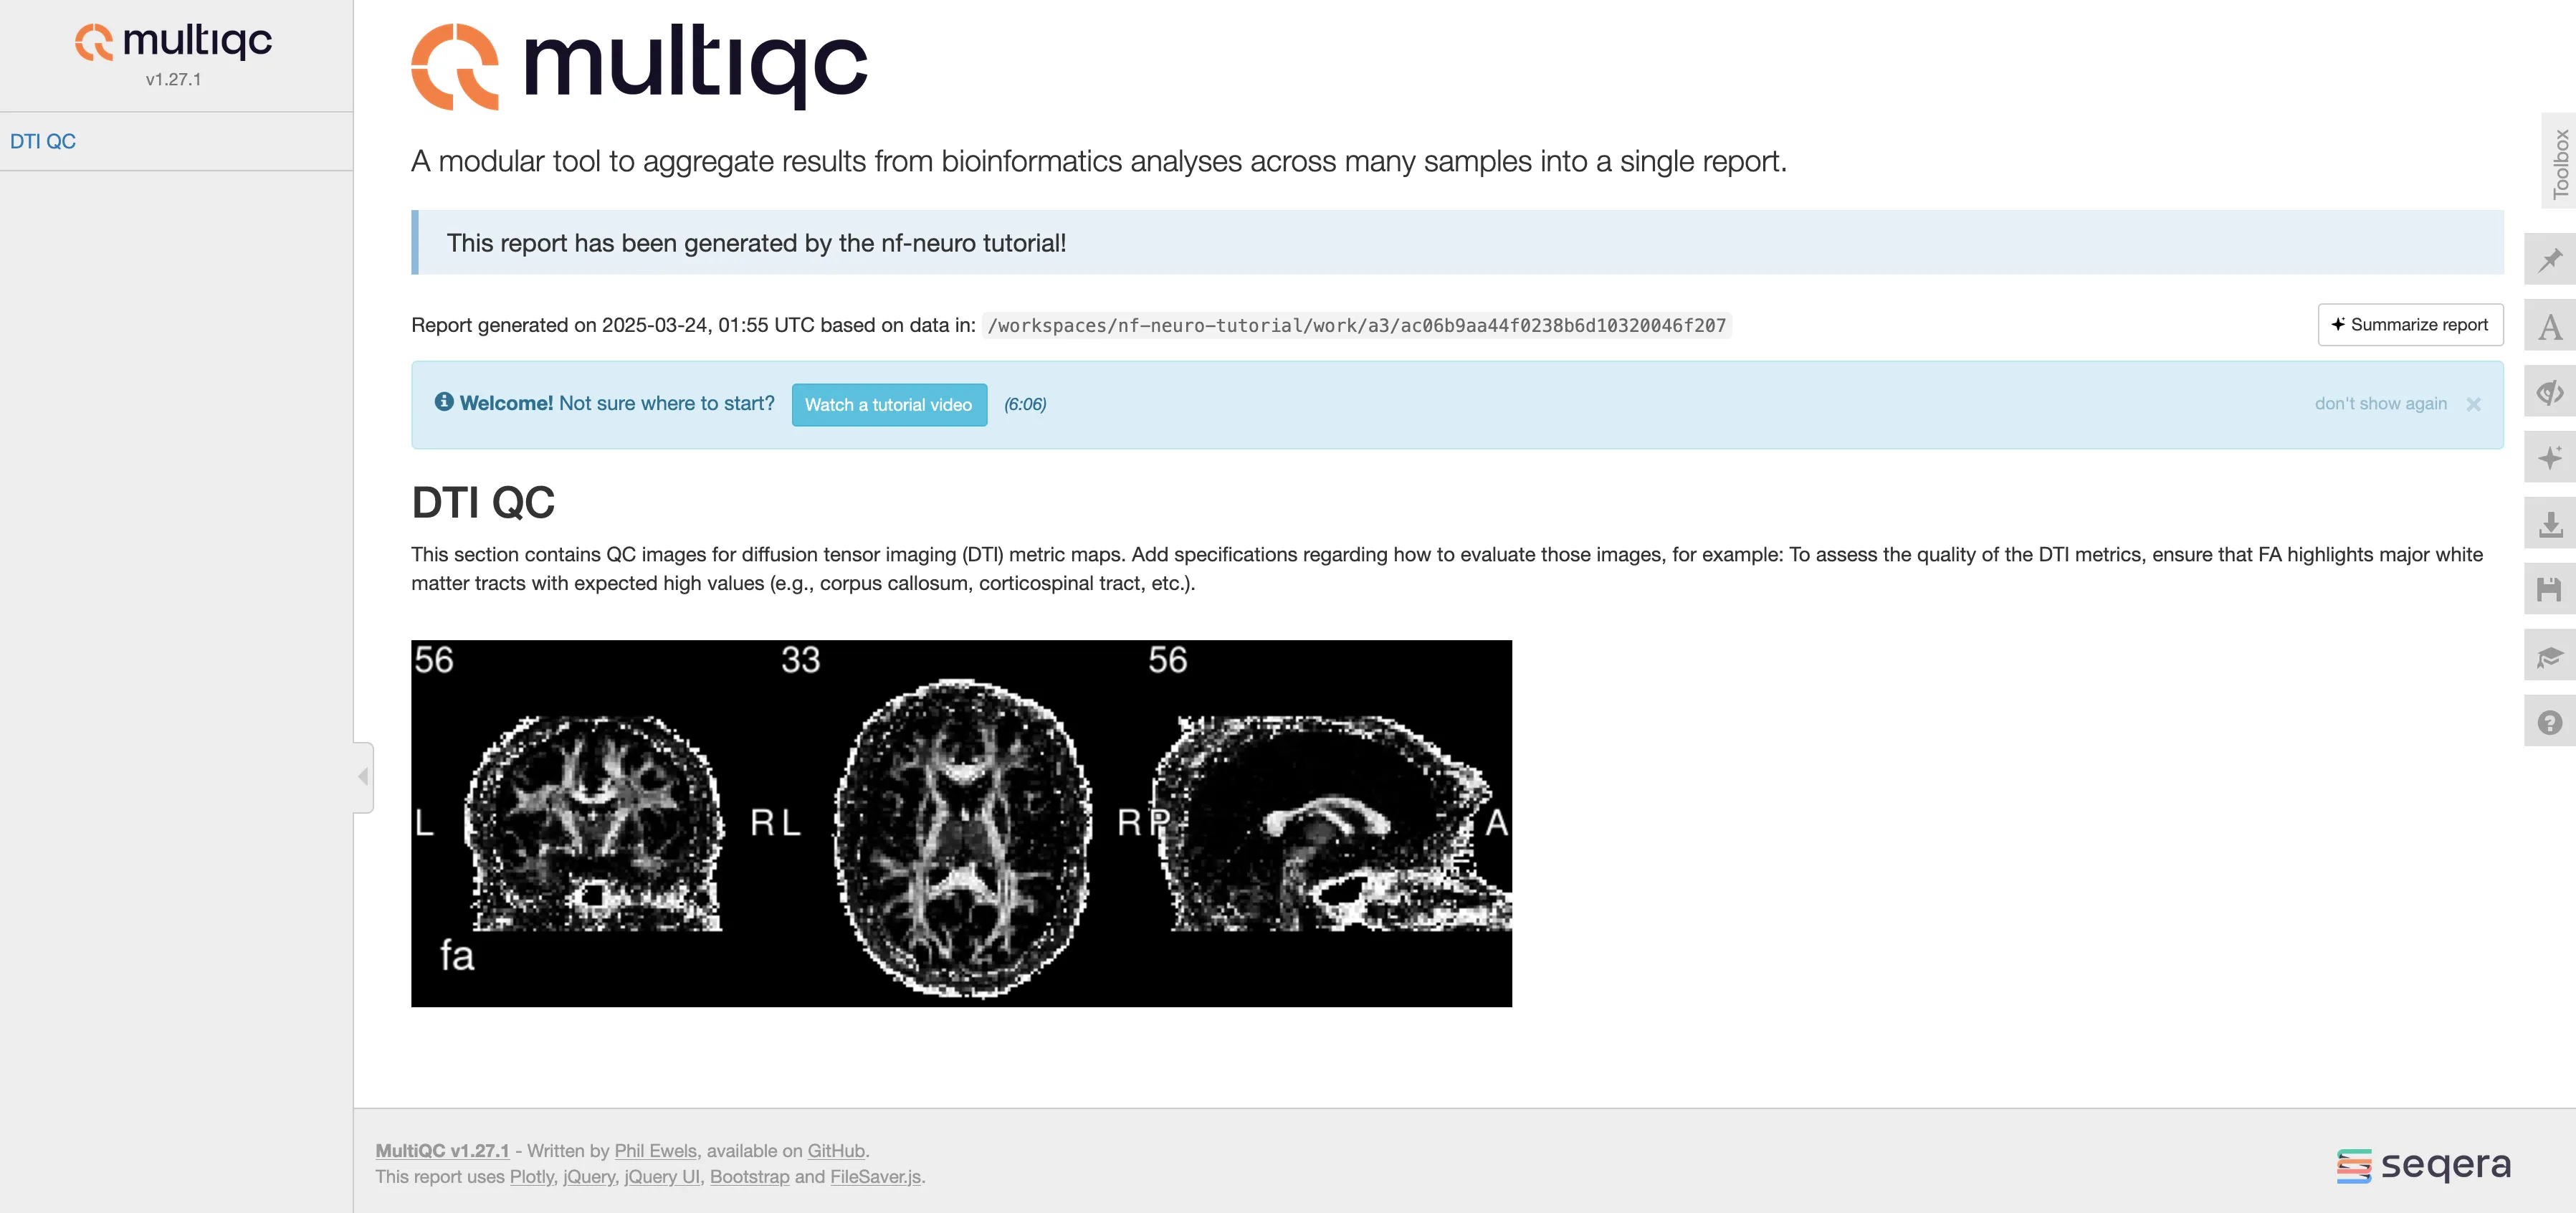
As you can see, the report is now much cleaner and informative!
Create a global MultiQC report
As described above, you can also create a single report containing quantitative metrics across all subjects. This is particularly useful to single out outliers needing further quality control. This section will be coming soon!