Setup for contribution
Quick setup : VSCode and devcontainers
Section titled “Quick setup : VSCode and devcontainers”The fastest way to start coding is with VSCode (≥ 1.95) and docker (≥ 24).
-
If you don’t have VSCode or docker installed yet, do it using the links provided above.
-
Open VSCode. If it opens in a project, close it or open a new empty window (
ctrl+shift+N). -
Open the VSCode terminal. For that, you can either pull on the VSCode window footer or use the
ctrl+shift+`keyboard shortcut (you will find the`key left to theEnterkey).
-
Test that you have access to docker. In the
VSCode Terminal, run :Terminal window docker run hello-worldUnable to find image 'hello-world:latest' locallylatest: Pulling from library/hello-worlde6590344b1a5: Pull completeDigest: sha256:bfbb0cc14f13f9ed1ae86abc2b9f11181dc50d779807ed3a3c5e55a6936dbdd5Status: Downloaded newer image for hello-world:latestHello from Docker!This message shows that your installation appears to be working correctly.To generate this message, Docker took the following steps:1. The Docker client contacted the Docker daemon.2. The Docker daemon pulled the "hello-world" image from the Docker Hub.(amd64)3. The Docker daemon created a new container from that image which runs theexecutable that produces the output you are currently reading.4. The Docker daemon streamed that output to the Docker client, which sent itto your terminal.To try something more ambitious, you can run an Ubuntu container with:$ docker run -it ubuntu bashShare images, automate workflows, and more with a free Docker ID:https://hub.docker.com/For more examples and ideas, visit:https://docs.docker.com/get-started/
Install nf-neuro
Section titled “Install nf-neuro”Next step is to install nf-neuro locally.
-
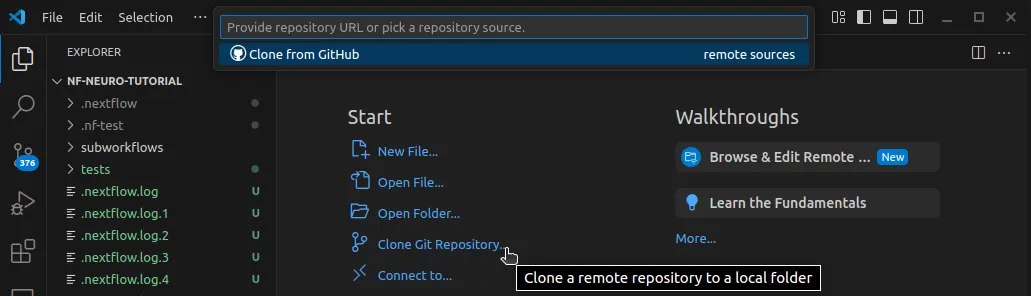
In you VSCode window, find Clone git repository under the Start main menu. Clicking on it opens the command palette at the top of the window.
-
Select Clone from Github and login if asked.
-
Search and select scilus/nf-neuro. Set a download location for the repository when asked, anywhere is fine.
-
Wait for a prompt to open the cloned repository directory in the current VSCode window.
Development container
Section titled “Development container”It will take only a few seconds for the editor to load up, but you don’t have access to the
development environment to its full extent yet. For that, you need the devcontainer.
-
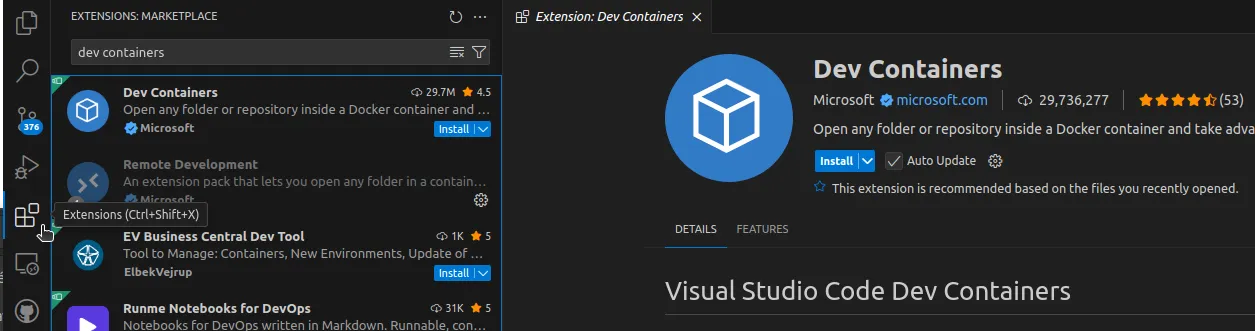
Install the Dev Containers extension. You’ll find it in the Extension Marketplace, located in the navigation bar on the left.
-
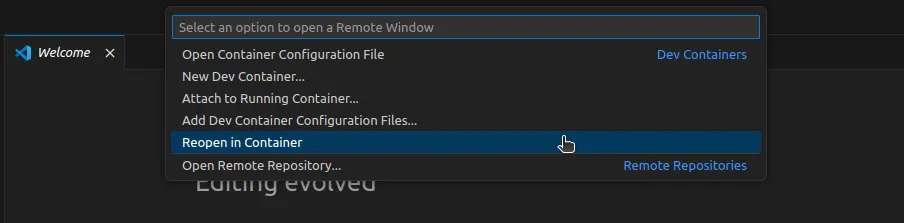
Locate and click on the Remote Window Menu icon at the bottom left corner of the VSCode window. The command palette opens at the top of the window.

-
Find the Reopen in Container option and click it.
-
There you will have a choice of container to build. Select devops.
-
Wait a few minutes for the container to build. It’s a good time for a hot drink .
Working in the devcontainer
Section titled “Working in the devcontainer”Once in the container, you’ll notice that, well, not much has changed in fact !
The whole content of the nf-neuro repository you cloned locally on your computer is accessible through the Explorer panel on the left.
Clicking on any file in the Explorer panel will open it in the
Editor area. Its content is the same locally and in the container. When you modify it inside the
container and save the file (ctrl+s), changes apply instantly on your computer.
The terminal is still located at the bottom of the window. Thugging at VSCode window’s footer will
open it, or you can use the ctrl+shift+` shortcut. There, you have access to tools installed inside
the container, like nextflow, nf-core,
nf-test and docker.
Sanity checks
Section titled “Sanity checks”Let’s verify that tools are available and working by running some quick and simple tests commands.
-
Open a VSCode terminal (pulling on the window’s footer or with the
ctrl+shift+`shortcut,`is on the left of the enter key). -
In the terminal, every command should have a specific prefix, added by
poetry, which means your python environment is valid. Nothing required, but if its not the case, open an issue, you’ve hit a bug !
-
nf-core/tools
Terminal window nf-core modules list remoteCheck the command’s header, above the list of modules, you should see this info message :
INFO Modules available from https://github.com/scilus/nf-neuro.git (main)Verify that the link you got is the same as above.
-
docker
Terminal window docker run hello-worldUnable to find image 'hello-world:latest' locallylatest: Pulling from library/hello-worlde6590344b1a5: Pull completeDigest: sha256:bfbb0cc14f13f9ed1ae86abc2b9f11181dc50d779807ed3a3c5e55a6936dbdd5Status: Downloaded newer image for hello-world:latestHello from Docker!This message shows that your installation appears to be working correctly.To generate this message, Docker took the following steps:1. The Docker client contacted the Docker daemon.2. The Docker daemon pulled the "hello-world" image from the Docker Hub.(amd64)3. The Docker daemon created a new container from that image which runs theexecutable that produces the output you are currently reading.4. The Docker daemon streamed that output to the Docker client, which sent itto your terminal.To try something more ambitious, you can run an Ubuntu container with:$ docker run -it ubuntu bashShare images, automate workflows, and more with a free Docker ID:https://hub.docker.com/For more examples and ideas, visit:https://docs.docker.com/get-started/ -
Nextflow
Terminal window nextflow run helloworldCheck the command’s output, you’ve been greeted in 4 different languages (english, french, italian, spanish) !
Terminal window N E X T F L O W ~ version 24.10.4Pulling nextflow-io/helloworld ...downloaded from https://github.com/nextflow-io/hello.gitLaunching `https://github.com/nextflow-io/helloworld` [disturbed_mahavira] DSL2 - revision: afff16a9b4 [master]executor > local (4)[59/71fa40] process > sayHello (4) [100%] 4 of 4 ✔Bonjour world!Hello world!Ciao world!Hola world! -
nf-test
Terminal window nf-test test modules/nf-neuro/reconst/dtimetrics --profile docker? nf-test 0.9.2https://www.nf-test.com(c) 2021 - 2024 Lukas Forer and Sebastian SchoenherrLoad .nf-test/plugins/nft-nifti/0.0.1/nft-nifti-0.0.1.jarTest Process RECONST_DTIMETRICSTest [4ab7ab0c] 'reconst - stub-run dtimetrics' PASSED (7.152s)SUCCESS: Executed 1 tests in 7.159s